If you’re a Chromebook user looking to capture your screen, you’ve come to the right place. In this guide, we’ll walk you through the essential methods and shortcuts for taking high-quality screenshots on your device. To get started quickly, you can use the following keyboard shortcuts:
Capture Entire Screen
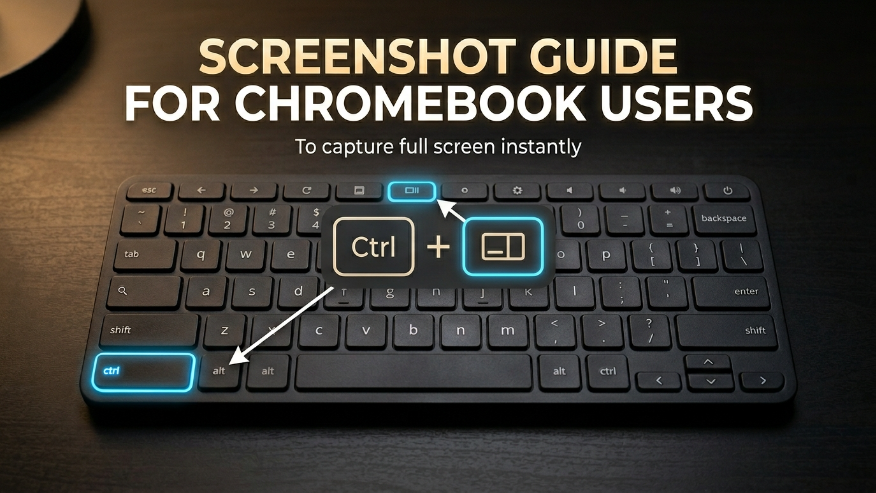
How to Capture Your Entire Screen
To capture your entire screen on a Chromebook, simply press the Ctrl + Show Windows keys simultaneously.
The moment you press this combination, you will notice a brief flash or “blink” on your screen, indicating the capture was successful. A notification will then appear in the bottom-right corner, confirming that your screenshot has been saved.
How to Take a Partial Screenshot
If you need to capture a specific image or a particular paragraph on your screen, you can use the Ctrl + Shift + Show Windows shortcut.
Once you press these keys, your cursor will transform into a crosshair. Simply use your mouse or touchpad to drag and select the exact area you wish to capture. As soon as you release it, the screenshot of that selected portion will be automatically saved to your device.
How to Capture a Specific Window
If you have multiple windows open and want to capture only the active one, simply press Ctrl + Alt + Show Windows.
Once you hit this shortcut, the screen will prompt you to select a window. Just click on the specific window you want to capture, and it will take a clean screenshot of that window alone, ignoring everything else on your desktop.
Screen Capture Toolbar
With the latest ChromeOS updates, Google has introduced a dedicated Screen Capture Tool that functions very similarly to the Windows Snipping Tool. This built-in feature makes it incredibly easy to take both screenshots and screen recordings from a single interface.
Here is how you can use the Screen Capture Tool to your advantage:
- Quick Settings: Click on the clock or battery icon in the bottom-right corner of your screen to open the Quick Settings menu. From there, simply select the Screen Capture icon.
- Keyboard Shortcut: If you prefer using your keyboard, you can launch the tool instantly by pressing Shift + Ctrl + Show Windows.
Once the tool opens, you’ll have the flexibility to choose between taking a still screenshot or recording a video of your screen.
Features of the Screen Capture Toolbar
Once you open the toolbar, you will see several different options that you can use depending on your specific needs. The features are as follows:

- Screenshot Mode: Click this to capture a high-quality still image of your screen.
- Screen Record Mode: Select this option if you want to start a video recording of your screen activity.
- Full Screen: This allows you to capture every element visible on your entire display at once.
- Partial: Use this to manually select and crop the specific area of the screen you wish to capture.
- Window: This option lets you target and capture a specific app window, keeping your screenshot clean and focused.
How to Edit a Screenshot
Immediately after capturing a screenshot, a pop-up notification will appear in the corner of your screen. By clicking on this notification, you can instantly open the image to edit it, allowing you to crop the frame or add drawings and annotations. Once you have finished making your adjustments, simply save the file to your device to keep the edited version.
Where are Screenshots Saved?
Whenever you capture a screenshot, the file is automatically saved to the Downloads folder within My Files. You can easily identify these files as they are saved using the format “Screenshot [Date] [Time].png”.
Chromebook Screenshot Keyboard Shortcuts
| Action | Shortcut |
|---|---|
| Full Screen Capture | Ctrl + Show Windows |
| Selected Portion | Ctrl + Shift + Show Windows |
| Specific Window (Active Window) | Ctrl + Alt + Show Windows |
| Advanced Menu (Screen Capture Tool) | Ctrl + Shift + Show Windows |
| Screen Recording | Ctrl + Shift + Show Windows (Click Video Icon) |
| Copy to Clipboard Only | Automatic |
- How to Screenshot on Mac
- How to Screenshot on Android
- How to Screenshot on iPhone
- How to Screenshot on Window
- How to Screenshot on Android Linux
To capture your entire screen instantly, press the Ctrl + Show Windows keys at the same time. You will see a brief screen blink and a notification confirming the image has been saved to your Downloads folder.
If you only need to capture a specific section or paragraph, use the shortcut Ctrl + Shift + Show Windows. Your cursor will turn into a crosshair, allowing you to click and drag over the exact area you want to save.
Yes, you can use the built-in Screen Capture Tool. Press Shift + Ctrl + Show Windows and click on the Video icon in the toolbar. This allows you to record your entire screen, a specific window, or a partial area with audio.
All your captures are automatically saved in the Downloads folder within the Files app. They are labeled clearly as “Screenshot [Date] [Time].png” or “Screen Recording [Date] [Time].webm” for easy identification.
To avoid capturing your background or taskbar, press Ctrl + Alt + Show Windows. The screen will prompt you to click on the specific window you want to capture, resulting in a clean, professional image of just that app.