If you are looking to capture screenshots in Linux, this guide is tailor-made for you. In this article, we will walk you through the complete process of taking screenshots in Linux so you can easily capture exactly what you need. To simplify the process, you can use the following keyboard shortcuts to take screenshots in Linux instantly.
Capture Entire Screen
How to Take Screenshots in GNOME (Version 42 and Newer)
The way you take screenshots in GNOME has changed significantly starting with version 42. The process is now much more polished, intuitive, and user-friendly. If you are using a modern Linux distribution with the latest GNOME desktop, here is how the new system works:
- PrtSc (Print Screen): When you press the Print Screen key, it no longer just snaps a full-screen photo. Instead, it opens a transparent interactive overlay. This UI lets you visually select whether you want to capture a specific area, a particular window, or the entire screen.
- Shift + PrtSc: If you want to jump straight into selecting a specific area of your screen, use this shortcut to trigger the selection tool immediately.
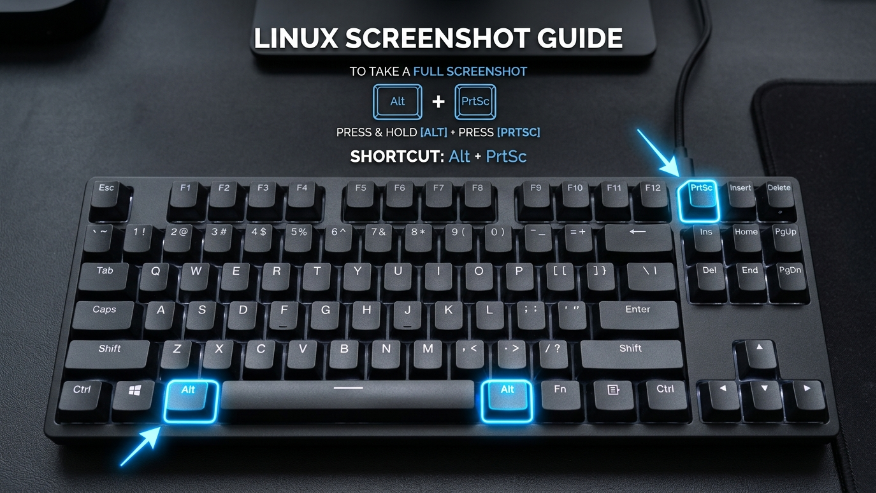
- Alt + PrtSc: Use this command if you want to quickly capture only the active window you are currently working in.
A Handy Built-in Feature: One of the coolest updates to the GNOME tool is that it now includes an inbuilt screen recorder. You don’t have to download extra software anymore; you can simply toggle between “Photo” and “Video” mode directly within the screenshot overlay to start recording your screen.
How to Take Screenshots in KDE Plasma (Kubuntu, Manjaro KDE)
If you are using KDE Plasma, you have access to Spectacle, which is widely considered one of the most advanced and feature-rich screenshot tools in the Linux world. It makes capturing and editing screenshots incredibly simple.
- PrtSc (Print Screen): This opens the Spectacle application window, where you can choose your capture mode and adjust settings before taking the shot.
- Meta (Windows Key) + Shift + Print: This allows you to immediately draw a rectangular region to capture only a specific part of your screen.
- Meta + Print: This captures the entire screen instantly and saves it directly to your Pictures folder without opening any extra menus.
Why Spectacle stands out: What makes KDE’s tool truly unique is its intelligence. It can automatically detect the active window under your mouse, making it perfect for quick workflow captures. Additionally, as soon as you take a screenshot, it provides built-in annotation tools. You can draw arrows, add text, or highlight important sections instantly before even saving the file
Third-Party Power Tools
If you are a Linux power user, you might find the default system tools a bit too basic for your workflow. For those who need more control, automation, or professional-grade features, there are several high-end utilities available. These tools allow you to capture and edit screenshots with much greater precision.
A. Flameshot (The Most Popular Choice)
Flameshot is a huge favorite within the Linux community. It strikes a perfect balance between a minimalist interface and a powerhouse feature set. It is widely considered the go-to tool for anyone who needs to edit screenshots on the fly.
- How to Install: – If you are using Ubuntu or a Debian-based system, you can easily install it by running this command in your terminal:
sudo apt install flameshot
The standout feature of Flameshot is its on-screen editing. Unlike other tools, it allows you to draw arrows, add text, and highlight sections directly on the screen while you are taking the screenshot. Additionally, it has a built-in blur tool, which is incredibly useful for hiding sensitive information like passwords or personal details before saving or sharing your image.
Ksnip (Feature-Rich Annotations)
If you are looking for a macOS-style screenshot experience on Linux, Ksnip is arguably the best tool for the job. It is designed specifically for users who need extensive annotation options and a polished, professional interface.
Taking Screenshots via the Terminal (CLI)
As any Linux enthusiast knows, the experience is incomplete without the Command Line. Terminal-based tools are lifesavers when your GUI freezes or when you are working on a remote server. In these situations, being able to capture your screen via the CLI is an essential skill.
A. GNOME Screenshot Tool
Even if you prefer the terminal, you can still trigger the default system utilities. By using the gnome-screenshot command, you can capture images without ever touching a menu.
- To capture a specific area: Run the following command:
gnome-screenshot -area
This will immediately change your cursor into a crosshair, allowing you to drag and select the exact portion of the screen you need to save. It’s fast, lightweight, and works perfectly within the GNOME environment.
B. Scrot (Screen Shot)
Scrot is a classic and highly reliable command-line utility for capturing screenshots in Linux. It is a favorite among minimalist users and those who love building their own custom scripts, you can install it on Ubuntu or any Debian-based system using this simple command: sudo apt install scrot
Once installed, Scrot is incredibly easy to operate directly from your terminal. If you need a few seconds to organize your windows before the shot, you can add a timer. For a 5-second delay, use: scrot -d 5. To take a full screenshot immediately, just type: scrot image.png
C. Spectacle (CLI Mode)
If you are a KDE Plasma user, you don’t always need to open the full graphical interface to take a screenshot. Spectacle comes with a powerful command-line mode that allows you to trigger specific capture types directly from your terminal. For users who want to quickly grab a specific part of the screen without navigating through menus, you can use the following command: spectacle -r
Where are my screenshots saved?
If you are a new Linux user, you might be wondering exactly where your screen captures end up. It can be a bit confusing at first, but the system is actually very organized.
The Default Save Location By default, most Linux distributions (like Ubuntu, Fedora, and Mint) automatically save your image files to the following path: ~/Pictures/Screenshots
Simply open your File Manager, go to the “Pictures” folder, and you will find a subfolder named “Screenshots” with all your captures labeled by date and time.
If you don’t want to save a file and just want to “copy and paste” an image into a document or a chat, you can use the Ctrl key modifier. For example:
- Ctrl + PrtSc: This will copy the screenshot directly to your Clipboard instead of saving it as a file.
Once it’s in your clipboard, you can simply use Ctrl + V to paste the image instantly into any application, such as an email, a Discord message, or an image editor.
Linux Screenshot Keyboard Shortcuts
| Action | Shortcut |
|---|---|
| Full Screen Capture | Print Screen |
| Selected Portion | Shift + Print Screen |
| Specific Window | Alt + Print Screen |
| Advanced Menu (Snipping Tool) | Print Screen |
| Screen Recording | Ctrl + Alt + Shift + R |
| Copy to Clipboard Only | Ctrl + [Any Shortcut] |
- How to Screenshot on Mac
- How to Screenshot on Android
- How to Screenshot on iPhone
- How to Screenshot on Chromebook
- How to Screenshot on Window
For users switching from Windows, Flameshot or the built-in GNOME Screenshot UI (triggered by the PrtSc key) are the closest equivalents. They allow you to capture rectangular regions, annotate with arrows, and blur sensitive data instantly.
In modern Ubuntu (GNOME 42+), simply press Print Screen (PrtSc) to open the interactive screenshot menu. You can also use Shift + PrtSc to immediately select a specific area or Alt + PrtSc to capture the current active window.
Most major Linux distributions, including Fedora, Ubuntu, and Linux Mint, save images in the ~/Pictures/Screenshots directory. Files are typically timestamped (e.g., Screenshot from 2026-04-04 15-00-00.png) for easy organization.
If you are using the GNOME desktop environment, you can use the built-in screen recorder by pressing Ctrl + Alt + Shift + R. Alternatively, press PrtSc and toggle the video camera icon in the overlay menu to start recording.
Yes, power users often use tools like scrot or spectacle -r. For example, running scrot -d 5 in the terminal will trigger a screenshot after a 5-second delay, which is useful for capturing open menus or tooltips.